Beginner Tufting: Creating an XXL Wool Rug | Happywool
Tufting for Beginners: Create Your First XXL Wool Rug
You've scrolled through Instagram, seen a fluffy rug shaped like a mushroom, heart, or cat, and pondered "how do they do that?" Welcome to the world of tufting. This technique, which involves punching wool threads through a backing canvas to create thick, colourful rugs, has exploded on social media and in home interiors in recent years. Good news: you don't need to be a professional artist to get started. With a bit of equipment, plenty of enthusiasm, and this guide in hand, you'll create your first XXL wool rug. Promise, it's simpler than it seems.
What exactly is tufting?
Tufting is the art of "tufting", that is, inserting tufts of wool into a primary canvas stretched on a frame, using a tufting machine. The result? A thick, soft, and fully personalised rug.
Two main techniques coexist:
Loop pile (wool loops), which gives a structured and graphic look, perfect for geometric patterns.
Cut pile (cut pile), offering a plush texture akin to a lounge carpet, ideal for comfy rugs.
As for the XXL size, it has everything to please: it adorns a wall, transforms an empty floor, and becomes the focal point of a living room. In short, it's the decorative object you'll want to show everyone.
Essential Equipment for Beginners
Before diving into the deep end, let's take stock of what to anticipate. Don't worry; we'll start with the essentials: you can always expand your equipment as you take on more projects.
Equipment
Purpose
Average Budget
Tufting machine
Punches the wool into the primary canvas
€150 – €350
Wooden frame
Stretches the canvas, like a drumskin
€40 – €120
Primary canvas
The base for tufting
€15 – €40
Acrylic or New Zealand wool
The raw material for your rug
€5 – €15 / skein
Glue gun + latex glue
Secures the threads on the back of the rug
€20 – €30
Electric shearing scissors
Evens the surface, reveals the details
€25 – €60
The Tufting Machine
The key tool. For your first XXL project, opt for a cut & loop machine, capable of both techniques. The AK-I and AK-III models are favourites among beginners: quick to master, reliable, with easy replacement parts. Budget around €150 to €350.
The Frame and Primary Canvas
The frame must be large enough to accommodate your project (allow for 20 cm of margin all around the pattern). The primary canvas should be stretched taut like a drumskin: not too loose, not too tight. Too loose, the needle struggles; too tight, the fabric may tear.
The Wool, the Star of the Rug
For an XXL rug (around 1 m²), plan generously: 1 kg to 1.5 kg of wool. Start with acrylic wool (economical and easy to handle) or go for a more noble wool for premium drape and a softer touch. You'll find plenty of texture and colour options in the Happywool selection of yarns and wools, with options suitable for large volumes.
Steps to Create Your First XXL Rug
Here we go. Follow these steps from sketch to proudly placing your rug on the floor:
Draw your pattern on the primary canvas with a permanent marker, keeping lines simple (geometric shapes, gradients, letters). Remember to invert the pattern if tufting from the back.
Stretch the canvas on the frame with staples or thumbtacks, ensuring it's flat. The canvas should bounce to the touch.
Thread the machine: the wool passes through a guide, right to the needle. Check the thread tension before starting.
Tuft section by section, from the background to the details. Hold the machine straight and advance steadily, avoiding jerks.
Apply the latex glue on the back of the rug to secure the threads. Let it dry flat for 24 hours.
Cut the canvas following the contours of the rug, leaving a 1 cm border.
Shear the surface with electric scissors to even and reveal the pattern details.
Attach a felt or fabric backing for a professional finish and optimal comfort.
💡 Pro Tip: Always tuft the outlines first, then fill the centre. Your lines will be sharp and your shapes well-defined.
Tips for Success (and Pitfalls to Avoid)
Start small before going XXL: a 30x30 cm trial helps you get familiar with the machine without wasting 2 kg of wool.
Choose a simple pattern for your first project: an abstract shape, a heart, a cloud, a colourful checkered design.
Test your colours before tufting: wool can look different in varying light conditions and thread densities.
Don't force the machine: if it jams, check the thread tension and needle condition before pulling.
Pay attention to finishing: a neatly tufted and well-layered rug makes all the difference between an amateur project and a piece you'll showcase in the living room.
Avoid: starting without a frame suitable for the project's size, choosing a canvas that's too thin (it will tear), or skipping the latex glue step: your rug will lose threads within the first week.
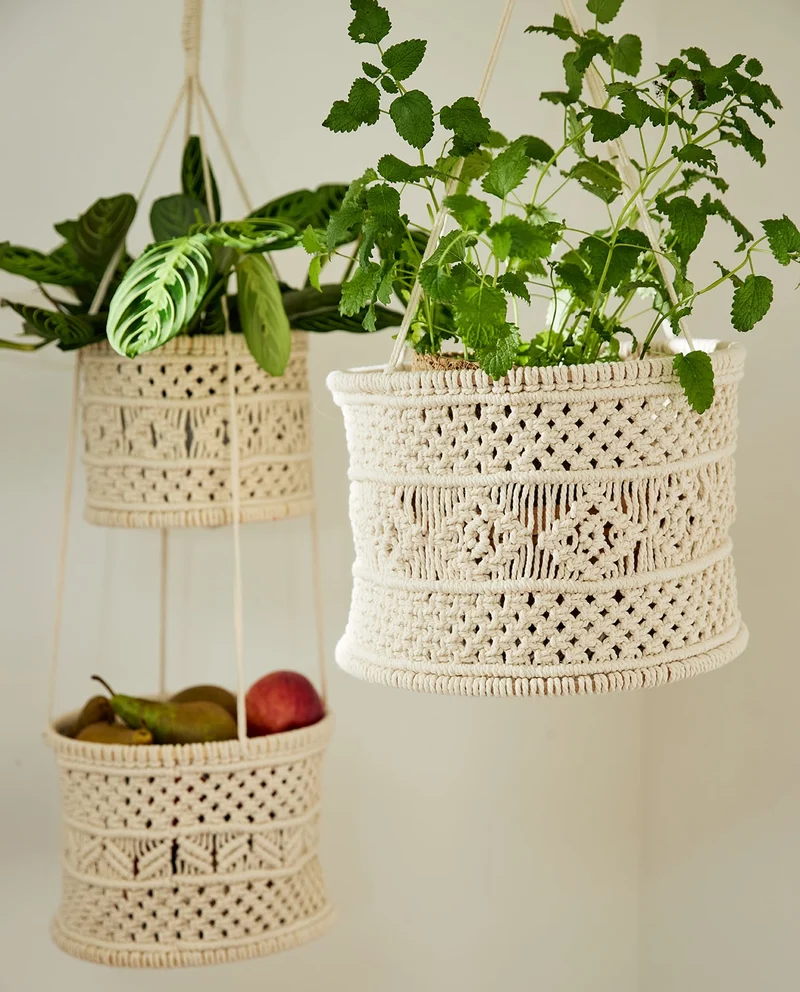
You're now ready to begin. Tufting is, above all, about passion and patience: the technique develops with practice hours, and each rug is better than the last. Pick your first wool, stretch your canvas, fire up the machine: your XXL rug awaits. And if you want to explore more homemade decor, have a look at other DIY projects on the Happywool blog: from macrame to weaving, there's plenty to inspire (such as this macrame plant hanger for adorning your interior).
Frequently asked questions
- How long does it take to create an XXL rug?
For a first rug measuring 80 x 100 cm, expect to spend between 8 and 15 hours of work, including finishing touches. As you become more skilled, you will become faster. Beyond the 5th rug, you might reduce the time to under 6 hours for a similar size.
- Is tufting noisy?
The tufting machine emits a noise comparable to a drill, around 70 decibels. It's better to inform your neighbours or tuft during the day. To lessen the sound, you can place a thick mat under your frame.
- Can a tufted rug be washed?
Yes, but only on the surface, with cold water and mild soap. Avoid the washing machine and tumble dryer, as they damage the fibres and latex glue. For stubborn stains, professional dry cleaning is the safest solution.
- Which wool to choose when starting out?
Acrylic yarn is perfect for beginners: it is affordable, offers a wide range of colours, and is forgiving of early mistakes. Predominantly natural yarn, on the other hand, delivers a high-end finish, which is denser and softer.
- Do you necessarily need a complete kit to get started?
Not mandatory, but a beginner tufting kit really makes life easier: everything is selected to work together, and you avoid unpleasant surprises in terms of compatibility (canvas size, needle type, yarn thickness). For a first project, it's the most relaxed option.